Pantry Pause

Finally I have the door finished to the pantry. It took far longer than I expected, but before I get into why that is, here she be.

FInished door

And another shot from the inside

I already wrote about some of the mistakes that pushed back the progress here. But I had (low) hopes that the automatic hinge closer would at least allow me to keep the push plate that I originally planned for the outside. It didn’t.

Boo

The pin cover didn’t even fit into the hinge, despite being the same brand. Once that crumbled up and I tore it off (because you can’t even see the brass pin in the hing anyway) I had hoped it would work. At first it wouldn’t even shut the door, despite the fact that it is a hollow core door. Then I tried adjusting the pressure to be higher, knowing full well from reviews that this was not a good idea. Sure enough it worked, once, then the spring popped off and I scrapped the idea altogether.

Putty and paint

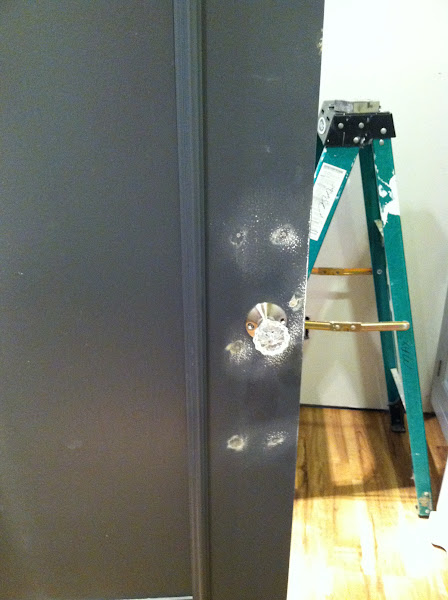
Just a little bit of putty and paint and the other handle from the set of two that I bought and I was on my way. The holes sanded and puttied okay, and I’m happy with the handle though a dummy handle (ie no need to turn it because of the ball catch) is not as intuitive as the push plate was.

But the best thing to come out of this project was by far my goof with the trim. Because the sheet rock is thicker than standard because it’s fire rated (I think) and made for basements, the pre-hung jamb was too narrow. I had tried to split the difference, which meant I needed to cover a gap on both sides between where the trim flush with the wall was and where the jamb ended. I had originally hoped to calk it, but after looking at a couple test pieces it would not have looked good. Thankfully I had some primed white, white wood shoe mold kicking around the basement that was thinner than 3/4″ but tall enough to cover the gap all the way around. We both love how this trim came out with the 3 pieces, the shoe mold, 1×4 flat and then 1×2(ish) surround. The surround is actually a 1×3 ripped in half, so it’s about 1 1/4″ thick (2 1/2″ / 2 – saw kerf).

Trim close up

Now that the door is done, I”m pushing pause on the pantry for now.

Pantry for now

I touched up the wall paint, added the plate covers back for now and started actually filling the cabinets with extra serving dishes, old dishes, anything from the stack of boxes that we actually wanted to keep. It felt really nice to actually put stuff away, even if the room isn’t finished. This is where I will leave off on my project list for the pantry; the upper cabinets, ceiling and baseboard are going to have to wait. I have a nook to plank, an entry to redo and a kitchen to renovate. Okay fine, it’s a play kitchen, but it’s in rough shape.

Beams o’ Light Install

Let’s start with the bad. This is the type of “never again shall we speak of this” type of lesson that I like to share (once) and then move on from never to repeat again. I knew when I was picking out the lights and doing my test fittings that the amount of wire poking out was less than ideal. I planned to get around this by wiring the lights on the ground before I put the beam up and possibly pigtailing in extensions if I had to. Here’s what I had to work with:

Little wires

Do you see them? That 1-2 inches of wire coming out the back there? Yes, I thought that would be okay. I thought I could wire nut those to the supply lines. I was wrong.

I struggled with it for much longer than I care to admit, but in the end decided I had to shorten the stem of the lights. Now I could have been patient and replace the 3″ pipe extensions with 1″ ones, but that would mean a trip to the store, many coats of spray paint and most importantly peeling off the worst label stickers known to man. I think it took me an hour to get the first set of four peeled off entirely and cleaned up. So, since I had full executive design control on the project, I made a switch.

The lights went from looking like this:Lights with extensions

To looking more like … well, we’ll get to that in a second. Suffice to say, I pulled off the extensions and hooked the lights directly to the plates that connected to the beam.

In order to install the beam I added some bracing under the existing LVL, screwing them up with Scorpion screws. Side note: I love Scorpion screws and use them everywhere. I’m irrationally smitten with them.  They rarely strip or bend or do anything other than drive straight and hold tight. Yay screws.
Bracing for attaching lower beam

Since I was doing the install myself I used a bunch of clamps to hold the board up while I glued and nailed in other parts. It worked surprising well, both on the bottom and later again on the face. So let’s throw in a another Yay for clamps. Yay clamps.

Bracing for attaching lower beam

I had also already added the support strips that I would nail the face to in addition to nailing it to the bottom beam and to the supports on the bottom as well. I wired up a nice long tail for the connection to the existing ceiling bulb and them clamped up the face beam. Originally I was going to put the two beam pieces together in order to get the tightest seam I could, but during the first test fit of the length of the bottom piece I quickly realized just how hard it was to maneuver the individual pieces in the narrow pantry, let alone trying to do it once they were together.

So here it is with the shortened lights, all nailed up.
Bracing for attaching lower beam

I had really hoped that I could get rid of the ceiling light altogether, but the light is too directed and isn’t going to cut it. But oh well, now it just means I get to plan something interesting for the ceiling light too. Here’s the pantry with just the beam lights on.

Bracing for attaching lower beam

I’m actually very happy with how the seam came out on the bottom. I had originally planned to build the beam as one piece and then install it together but it was hard enough to maneuver the individual boards in the tight space of the pantry, I didn’t want to smash up the walls or the beam by doing it in one piece.

Bracing for attaching lower beam

So thankfully the only “never again” part of this was trying to wire lights up with too short of leads when I KNOW they are too short and shouldn’t have even bothered trying in the first place.

This means I can cross the beam off my project list for the pantry and move on to maybe a door? Or trimming out the lolly column?

Beams o’ Light Prep

Running across the non-cabinet wall of the pantry is a massive LVL that is basically holding up the center of our house. It’s just a bit important, but it’s not exactly the nicest design feature I’ve ever seen. Here it is in all of it’s glue-lam glory.

Lolly column side of beam

And an HVAC supply on the other side

Each side of the beam has a special surprise, on the right is a lolly column supporting it and on the left is a HVAC supply for the bathroom heat register. My plan to cover all of these things up includes:

  • putting a smaller fake beam that runs all the way to the wall around the LVL
  • making a fake wood post over the lolly column
  • hanging a shiplap faux ceiling that can still be pushed up to hide the joists / pipes / hvac stuf

So my plan for the smaller fake beam was pretty straight forward. I wanted to wrap the lower part of the beam with a 1×10 on the bottom and a 1×6 on the face. The bottom would go all the way to the wall, the face would come up and form the support for the faux ceiling to rest on, on one side of the room.

I of course can not do simple, so I decided to add some lights to the faux beam, like we have in the kitchen over the sink. Eventually I will post about the kitchen and link a nice photo here. I hope. In the kitchen we bought lights, but I wanted to go a different route in the pantry, particularly since I have design making decision power there.

So I bought:

  • some exterior utility lights that screw into sockets

Exterior Lights (one dismantled)

  • some plumbing supplies

Plumbing supplies

  • some spray primer (okay, I actually had that on hand, but still)

Priming up the lights

  • and some bright yellow glossy spray paint

Bright glossy yellow

Now that I had the lights well under way I borrowed my dad’s truck and ran out to the local lumber store to buy the 12′ 1×10 and 1×6. While out with the truck we also grabbed a Christmas tree, but that’s neither here nor there. The plan for the beam was simple, just cut the twelve footers to length, stain them, install the wiring and that’s it.

Cut to length

First I cut them to length and notched out for the lolly column. I also had learned my lesson from doing the kitchen beams and I made sure to scribe out for the difference in length at the corner due to joint compound and tape. In this case it was about a 1/4″ difference in length, which makes a huge difference when trying to fit the beams up later.

Small gloves

I’m pretty sure that Shannon must have bought the gloves because they didn’t even come close to fitting on my hands. You can also see in this shot that I had already drilled the holes for the lights. The last thing I wanted to do was screw up a nice finish later on when drilling the holes.

I stained the beams with the same English Chestnut stain I used on the countertops. I also used the pre-conditioner again, but I don’t know how much of a difference it made here. Once the beams were mostly dry (I waited maybe 2 hours? not the required 4-6) I brought them inside and started attaching the wiring to the back of the face beam. I made sure to buy very shallow boxes (1 1/4″) that could fit between the LVL and the fake beam face. Thankfully I had a bunch of wire left over from wiring the house to use so that was a nice bonus not to have to buy that.

Running the wire

And that was about it for the prep work. I will get into the “never again” saga of wiring the lights and my misfortunes on the install later, but I will leave you with a preview of what I intended the beam and lights to look like. Spoiler, it doesn’t.

Beam mock-up

Floored

First here is what the floored pantry now looks like.

Floor in the new pantry

The number of times I changed my mind on the flooring option for the pantry was ridiculous. I originally planned to use TrafficMaster Allure from Home Depot in something like Traditional or Pacific Pine. I like the idea of a vinyl plank floor that would be resistant to water damage which is not inevitable but fairly likely in the basement. The pantry is underneath our downstairs bathroom / laundry room and though I hate to think about anything happening up there, this is where the water would end up. I was okay with the price point (about $2 a sq. ft) but nervous about the amount of flooring in a pack. I think I would have had something like %5 extra with 3 boxes so there was a good chance I’d have to buy an entire extra box, boo. So I went and I happened across a similar product at Lowes that was in stock for a similar price and you could buy individual planks as well as cartons. The only problem was that it glued down to the floor and I was nervous about getting a good bond, moisture in the concrete ruining the glue later, etc. etc.

So back to Home Depot I went and I happened to look at the Allure Ultra section, knowing it was pricier but didn’t have any glue. Unfortunately I would have been even worse off in terms of carton sizing, having to buy a full extra carton for sure in order to finish the floor, and at 1.5 the price it wasn’t looking good. And then next to the Ultra was a VERY similar looking product called Traffic Master Interlock. It looks very similar to Allure Ultra, and has a near identical locking system. The only difference I think is that the Interlock is less flexible, a little thicker (maybe) and comes in only like 2 colors. The price was exactly the same as the Ultra BUT the carton size was different! Meaning I only had to buy 3 boxes to get enough for the floor plus the 10% extra needed for end cuts / staggering the line or what have you.

The floor probably took me 3 hours to lay. I had worked with Allure Ultra when I laid it in the upstairs bathroom so I was ready. It cuts easily with a sharp knife and then you snap it and clean up the cut. I think I used a jig saw for the more complicated cuts in the bathroom (toilet drain, water supply hoses, etc.) but all I needed in the pantry was the knife and at the end some tin snips to cut out flaps for under the cabinets.

This was my usual method for cutting anything. I really only had to cut around the base of the lolly column, a bit by the door so that the threshold will fit in later, each end for my staggering of the joints and then under the cabinets.

I was especially psyched that I had just enough left over to fill in the freezer space that I hadn’t 100% planned on doing, and that my left over scrap pile was so small.

I still have to add the toekick to the cabinets, but I did get to replace the outlet cover on the outlet in the back of the large double cabinet. I didn’t move any of the receptacles around when doing this, and even though I will likely never use this outlet, I’m still glad it wasn’t blocked by a shelf or cabinet divider. Also here you can see the little flaps I cutout to go around the cabinet “feet.”

The moment I was most proud of in this whole thing though was probably moving the freezer back in without hurting the brand new floor that I laid. All I did was to grab 3 2x10s that I had in the basement and walk it across back into place, but it felt like a ridiculous triumph. I know I’ve been burned in the past by trying to do one last thing at the end of a project and I really don’t know if I could have taken the blow right now. So here’s me (in my work sandals) shimming the freezer back into place.

Okay one more shot of looking in at the new floor.

So I can now check floors off the list and move on to the big faux beam (to cover the real LVL beam that kind of holds up the center of my house) and a door to keep out dirt (and kids, covered in said dirt). Speaking of…

Also I had to share that while I was busy laying the floor the kids were equally busy playing restaurant cooking me up some delicious lunch. I believe this was chocolate cake, scrambled eggs and a tomato salad.